29 July 2011

Bacon Doesn't Live Here Anymore

OHMYGOSHYOUHAVENOIDEAHOWEXCITEDIAM! I am as excited about the new website as this lady is about rainbow sponges:


I have been feeding my design team (also sometimes called a "boyfriend") bacon and other treats for months to keep his strength up while he lovingly slaved away on a new shiny website. And it's here!

So, kindly redirect your URL and bookmarks to the brand new http://baconandotherbadhabits.com and click one of the "subscribe options" in the upper right corner to subscribe by rss feed or by email. Recipes delivered straight to your email box? It's like a squiggly rainbow-sponge dream come true [see above video] but with more bacon!

11 July 2011

Bacon Is Meat Candy When Candied

Do you know what's better than bacon? Candied bacon. Do you know how you candy bacon? You add sugar of course! I mean, okay, I didn't say "Do you know what's better for you than bacon..." did I? No. And with the addition of cream cheese and pastry crust this isn't exactly the healthiest recipe I've ever posted here. So, let's suffice it to say that these are meant to be served/eaten as appetizers. Delicious candied-bacon pâtisserie appetizers!
Candied Bacon Pâtisserie
--4 slices of bacon
--4 TBSP un-packed brown sugar
--1 refrigerated pie crust rolled out into even thickness
--1/4 brick of low fat cream cheese or neufchâtel
--1/4 cup of sun-dried tomatoes


Space the bacon slices on a cookie sheet. Sprinkle each piece with brown sugar and place in the oven at 350 degrees. Cook until bacon is golden brown. Remove to a paper-towel lined plate to drain. Pour excess grease from pan into a jar or container (you never want to pour grease down the drain!).

When the bacon is cool enough to work with, use scissors to cut the bacon slices into 1/2" wide pieces.
Slice the pie crust into 20 squares. Place a pat of cream cheese on each square. Top with 2-3 sun-dried tomatoes and 1 piece of sliced candied bacon. Roll up the crust into a nice little package and place on to a new clean cookie sheet. (You don't want to re-use the bacon cookie sheet without wiping it down really well first. Otherwise the bottoms of your pastries will burn due to any remaining bacon grease on the pan. If you have a second cookie sheet it's usually easier just to use that).

Cook the pâtisseries at 350 degrees for 15 minutes or until golden brown. Allow to cool 5 minutes before serving (else the cheese might burn your mouth!). Unlike revenge, this recipe is a dish best served warm.
Dammit Jim, I'm a cook, not a doctor...
Time: 35 minutes
Serves: 20 pâtisseries
Calories: 93 calories per pâtisserie

06 July 2011

Pasta With A Pinch Of Pine Nuts

Pine nuts (or pinon seeds) were once a hot trading commodity in Colorado and New Mexico. While times (and currencies) have changed, pine nuts still remain a pricey little taste of heaven. I buy mine in bulk to help curb costs and to allow me to have pine nuts to use at my disposal whenever I deem fit. When toasted, these nuts can be added to salads, pastas, or served as a snack.

Today's recipe is a summery pasta that also incorporates another bulk food fave--sun dried tomatoes--to a yogurt based cream-lite sauce. If you have a lemon handy, I also recommend adding just a little zest to each portion for a bright finish.
Chicken Spinach Pasta W/ Sun-Dried Tomatoes and Toasted Pine Nuts
--1 cup fettuccine or linguine noodles
--1/4 cup pine nuts
--cooking spray
--1 large chicken breast, sliced into strips
--salt and pepper to taste
--1 medium onion, sliced vertically into strips
--garlic, minced
--crushed red pepper
--1 cup 1/2 and 1/2
--1/4 cup plain yogurt
--1 tsp flour
--1/4 cup sun dried tomatoes
--1 cup fresh baby spinach leaves
--1/4 cup fresh basil leaves, torn
--4 oz. grated parmesan cheese
--lemon zest (optional)


Cook the pasta according to package directions, omitting oil and salt.

Spread the pine nuts out on a cookie sheet or metal baking pan. While the pasta cooks, roast at 250 degrees for 7 minutes before turning and continuing to toast. Do not let the pine nuts burn, you want them to be golden brown. Remove from oven and set aside to cool.
Season the chicken pieces with a smidge of salt and a healthy dose of black pepper. Heat a large skillet on medium high heat. Coat the pan with cooking spray and cook the chicken for 4 minutes on each side. Remove from the pan when done. Re-coat the pan with cooking spray and add the onion and garlic. Sauté for a few minutes until the onion begins to get translucent. Add the red pepper flakes and stir to combine.

In a bowl, combine the 1/2 and 1/2 and yogurt. Whisk in the flour. Add the mixture to the pan and bring to a boil. Stir in the sun-dried tomatoes and simmer for a few minutes before adding the spinach, basil, chicken, and cooked pasta. Cook until thoroughly heated and serve, sprinkled with toasted pine nuts, parmesan, and lemon zest.
Dammit Jim, I'm a cook, not a doctor...
Time: 40 minutes
Serves: 4
Calories: 442 per serving (includes 1 oz. cheese)

03 July 2011

Toasty Buns=Tasty Brunch

Brioche is delicious, let's start there. I have a hard time imagining anything made from eggs and butter wouldn't be tasty, for obvious reasons. Some of the best French toasts I've ever had were made with brioche. But brioche is also hard to come by, unless you happen to live down the street from a boulangerie. So, I make my French toast with the poor-man's brioche––slider buns.

I know, you're thinking how intrepid that is and I'm blushing just thinking about all the compliments your internal monologue is surely bestowing upon me. Thank you! But speaking seriously, the only thing that goes better with tiny buns than sliders is surely french toast slathered with fresh fruit compote. Plus, slider buns are about 100 calories each, so split it half... Well, screw the math: Let's make brunch!
Brioche-style French Toast with Compote
--3 slider buns, tops and bottoms separated so you have 6 pieces of toast
--2 eggs
--1/4 tsp cinnamon
--1 tsp butter

--1 ripe pear, cored and chopped into chunks
--1 cup blackberries
--1 TBSP honey
--1 tsp maple syrup
*

[*Please note, Aunt Jemima, not maple syrup. Maple syrup is delicious and comes from trees (yum, trees). If it doesn't say "Maple Syrup" on the label then it's made out of corn syrup. Corn syrup, while also delicious, is not the same as maple syrup. Okay, tirade over.]

Crack the eggs into a bowl and use a fork to whisk them into an egg wash (but not an over-beaten egg mess). Add the cinnamon to the eggs and stir one more time to spread the spice out a bit. Dredge each bun piece in the egg mix, soaking for about one minute total per bun piece.
Melt the butter in a large skillet over medium heat. Add the buns and cook until each side is golden brown.

While the toast cooks, add the pears and blackberries to a smaller skillet. Heat on medium-low heat. You do not need to add any oil to the pan as the juice from the fruits will both lubricate the pan and slowly carmelize. Add the honey and maple syrup and stir to combine. Stir the fruit regularly so that it begins to soften and is warmed throughout.
Serve the toast topped with the compote and enjoy! The compote creates a lovely syrup, don't you think?
Dammit Jim, I'm a cook, not a doctor...
Time: 20 minutes
Serves: 2
Calories: 378 per serving
15 June 2011

This Casserole Is All Growed Up, Just Like You

Broccoli cheese casserole is one of those truly brilliant comfort foods; mostly because its covered in cheese. I think for most of us it was a sneaky yet tasty way for our parents to try and get us to eat broccoli as kids. Unfortunately, most recipes for the dish aren't very healthy.

Think of this recipe as the broccoli cheese casserole for grown ups. There's still cheese. (I wouldn't do that to you, take away your beloved cheese. That would be cruel.) I've added cauliflower for extra fiber and tons of Vitamin C. Both cauliflower and broccoli are cruciferous (and you know how I feel about cruciferous veggies what with their awesome antioxidants and cancer-fighting skills). The addition of curry adds another layer of flavor to do a little Bhangra dance in your mouth.

And, as if you needed another reason, boys really seem to like eating this casserole. At least every boy I've ever fed it to...

Curried Cauliflower and Broccoli Cheese Casserole
--1 small head of cauliflower, chopped into florets
--curry powder
--paprika
--black pepper
--olive oil (you will need 2 TBSP total, but exact measurements for each step of the process are below)
--1 cup Jasmine rice
--pinch of salt
--garlic, minced
--small onion, chopped fine
--1 small head of broccoli, chopped into florets
--1 cup + 1/2 cup vegetable (to keep vegetarian) or chicken broth (to add even more delicious flavor)
--4 oz. sharp cheddar cheese, cubed
--4 oz. mild or medium cheddar cheese, cubed
--1 oz. sharp cheddar cheese, shredded
--1 oz. mild or medium cheddar cheese, shredded


Heat the oven to 350 degrees. Place the cauliflower florets in a food storage bag or Tupperware with lid. Add 1 TBSP of olive oil and the curry powder, paprika, and black pepper (generous shakes of the spices or about 1 TSP each to coat the cauliflower pieces). Shake it up until the cauliflower is evenly coated with the spice mixture. Place in an oven proof dish and roast in the oven while the rice cooks (about 20 minutes or so).
Cook the Jasmine rice according to package directions, adding 1/2 TBSP olive oil and a pinch of salt.

Heat a large skillet over medium heat. Add the remaining 1/2 TBSP olive oil and swirl to coat the pan. Sauté the onions and garlic for several minutes, stirring often. Add the broccoli florets and sauté for several more minutes, again stirring regularly.
Remove the cauliflower from the oven and add it to the skillet. Stir to combine with the other veggies. Add the cooked rice to the pan and stir in with 1 cup of chicken broth and the cubed cheeses. Remove from heat. The cheeses will begin to melt into the mixture.

Transfer into a large baking dish and add the remaining 1/2 cup of broth to the dish. Sprinkle with the grated cheese and bake the casserole for a half hour. It will be so damn tasty.
Dammit Jim, I'm a cook, not a doctor...
Time: 70 minutes (and worth every second)
Serves: 6
Calories: 381 per serving

12 June 2011

A Mexican Favorite With An Italian Touch

John Trujillo taught me how to make fajitas over a bar counter. I never set foot in the kitchen of the restaurant he owned for 20+ years but I spent a lot of time sitting at the bar. His daughter was a good friend of mine in high school--still is--and so many afternoons were spent at "The Mish," as the family restaurant, Mission Trujillo, was known. Sadly, the restaurant closed its doors in December of 2006, while John and the family set out on new adventures.

The secret to the Mish's delicious (and naughtily named) Chi-Chi Chicken as well as their fajitas? Italian dressing. It might sound blasphemous coming from the proprietor of a Mexican restaurant, but chicken marinated in Italian dressing yields beautiful results!

For the past several months John has been valiantly fighting against cancer. I know his family thinks there is no such thing as too many prayers, so if you have time to send good ju-ju John's way, please do. Regardless, I think of him every time I make these fajitas, and I hope you will too.
Chicken Fajitas
--1-2 TBSP Italian salad dressing
--2 boneless, skinless chicken breasts, sliced into thumb sized pieces
--1 TBSP olive oil
--garlic, minced
--1 medium white onion, sliced vertically into 1" pieces
--1 small red onion, sliced vertically into 1" pieces
--1 red bell pepper, top and seeds removed, then sliced vertically into 1" pieces
--1 green bell pepper, top and seeds removed, then sliced vertically into 1" pieces
--fresh cracked pepper (and lots of it!)


**Note: The best fajitas are made in a cast-iron skillet. Mine was "lost" in the move. But I highly recommend cooking fajitas (and all the delicious accoutrement) in a cast-iron skillet. That skillet will deliver beautiful blackened chicken and wonderfully caramelized vegetables, far superior to what any other pan can do.

You can marinate the chicken as early as the night before, though I usually only do mine for about an hour. I believe the Mish marinated theirs for at least several hours before cooking, so the choice is yours.
Heat a medium-sized skillet on medium-high heat. Add the olive oil to the pan, followed by the veggies. Crack fresh black pepper over the veggies (I layer it on thick). Cook until tender, using tongs to flip a few times during the process. My favorite trick is to layer the veggies in the pan and leave them alone for several minutes until they begin to brown, then I flip them and repeat on the other side until its time to simply toss to continue an even cooking and browning pattern. When the veggies are softened to your liking, set aside.
Add the chicken to the same pan and coat with more fresh cracked pepper. Tossing the chicken regularly will help the chicken from sticking to the pan. You can add a little more oil if necessary (1 TSP is enough to do the trick) and then try the let-brown-on-one-side-before-turning method described above if you like. Cook until the chicken is salmonella-free, then add the pepper/onion mix back to the pan to re-heat and mix. Serve!
Dammit Jim, I'm a cook, not a doctor...
Time: 25 minutes active cooking time + minimum 1 hour marinating time
Serves: 251 per serving
Calories: 4

01 June 2011

Leah's Kidnapping -or- A Southern Vegan Treat

Dear readers, it is my painful duty to inform you that the recent silence from your beloved Bad Habits is because our dear Leah has been kidnapped. It seems her fears of the Vegan Police weren't just paranoia or a plea for attention. As I type, she is being forced to eat tempeh bacon while in the company of rescued pigs.
So, in an effort to appease the police and pass on their super powers, here is an easy and delicious southern-inspired vegan meal in two parts!
Red Beans and Rice Burgers
Red beans and rice are good, sure, but it's a scientific fact that everything is better in burger form.
What you need:
  • 1 can kidney beans
  • 1 cup cooked rice (I use brown short grain)
  • 1/4 onion
  • 2 celery stalks
  • 1 red bell pepper
  • 2 teaspoons Cajun spice mix
  • 1/2 tsp liquid smoke (optional, but highly recommended)
  • 1 tbs + 1 tsp Arrowroot or Corn Starch
  • Earth Balance or oil for frying
What you do:

Sautee veggies in Earth Balance or oil until they start to brown. Add spices, sautee another minute and set aside to cool. Don't clean the pan!
Mush beans (they don't need to be smooth) and then stir in all the other ingredients.
Form into patties--I used a 1/3 measuring cup to keep the size uniform and made 7 patties.

Cook the patties in the leftover veggie juice a few minutes until brown.

**Tip: If you soak your rice for at least an hour before cooking (I do overnight) it will cook faster and be more moist. Cook it in fresh water, though. If you're lazy, as I often am, this can be skipped, obviously.
**A good thing about this particular burger recipe: You can change the beans and spices to make it however else you want it--such as chickpeas and curry with peas and carrots instead of celery and bell pepper.
Betsy's Deluxe Corn Bread

A while back, my mom let me borrow a cookbook full of our neighbors' favorite recipes. This is a variation of one, and it's probably the easiest thing ever. I like it for its simplicity, but feel to add something more exciting to it (my mom always used bell peppers and jalapenos).
What you need:
  • 1/2 cup unsweetened applesauce
  • 1 cup sour cream (I used Tofutti Sour Supreme)
  • 1/2 cup olive oil
  • 1 cup corn
  • 1 cup corn meal
  • 1 1/2 tsp salt
  • 3 tsp baking powder
What you do:
Mix everything in a bowl until well combined.

Pour into 8" square baking dish and bake at 375 for 45 minutes or until just browned.
(No, really, it's just that easy)
Now that you have your burger and cornbread, serve it up with a side of slaw and collards and a big glass of sweet tea!
In case you're curious, my slaw is a bag of red cabbage, 4 carrots, a dash of ume vinegar, a spoonful of Vegenaise and some pepper. I steam my greens in a little olive oil and add a splash of soy sauce and vinegar when they're almost done.

15 May 2011

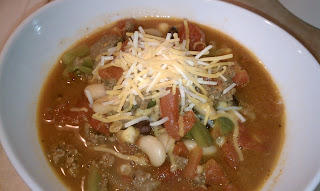
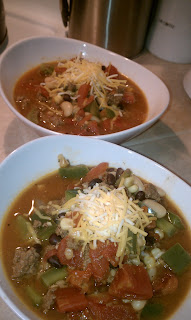
Chili To Feed The Masses (Or Just You!)

Mmm, chili. I know football season--classic chili time--is over, but screw the seasons. You should eat chili any time you want. Because it's delicious. (Sorry, I've been watching a lot of Parks & Recreation lately so I may be channeling a little Ron Swanson there). So delicious in fact, that when the BF and I hosted a big Mother's Day to-do at our house last weekend, I made this chili (doubling the recipe below to feed all 12 of us). It was a big hit!

This chili is made with ground bison, making it a leaner and lighter option than standard chili. I also add in a ton of veggies, which play dual roles in adding great nutritional value and--more importantly--great flavor. And, making up a big pot of soup means figuring out what to take for lunch is made an easy choice for a few days!

What's the difference between bison and buffalo? On food labels and restaurant menus they appear to be synonymous, but just know that a bison is the bearded creature of the classic American west, whereas the buffalo is his beardless African and Asian cousin.
Bison Two-Bean Chili
--1 lb. ground bison meat

--2 TSP canola
--small onion, diced
--garlic, minced
--oregano
--cumin
--chili powder
--10 oz. frozen corn
--bell pepper, diced
--1 zucchini, quartered and diced

--2 14.5 oz. cans of diced tomatoes with juices
--1 chipotle pepper, chopped
--15 oz. can black beans, rinsed and drained
--15 oz. can kidney beans, rinsed and drained (you can use white or red beans, whatever your pleasure, when I'm feeling sassy I add both and make this a three-bean chili. Just sayin'.)
--1 cup water
--2 TBSP tomato paste
--3 oz. shredded cheese
In a dutch oven or large stock pot cook the bison over medium-high heat (add no oil to the pan). Stir to crumble as it cooks and set aside. Drain any fat from the pot and return to the stove.

Add the canola to the same pot and turn the heat down to the medium. Add the onion, garlic, cumin, chili powder, and oregano and stir well to combine. The spices will distribute themselves around the garlic and onion pieces and give your chili a consistent flavor throughout. Cook for a few minutes, until the mixture is fragrant and the onion is translucent. Add the frozen corn and cook for five minutes, stirring regularly. Add the diced bell pepper and zucchini and cook for 3-5 minutes so the pepper begins to soften. Add the canned tomatoes with their juices and let the mixture bubble (there is no need to adjust temperature).
Add the bison back to the pot and add in the chipotle pepper, tomato paste and beans. Stir to combine and let cook for one minute before adding the water. Bring the pot to a boil. Cover, reduce the heat and simmer for at least 10 minutes before serving.
Cook uncovered for two minutes. Then spoon into bowls and top with 1 dollop of grated cheese.
Dammit Jim, I'm a cook, not a doctor...
Time: 55 minutes (including prep)
Serves: 6
Calories: 273 per serving

14 May 2011

Plans Change, Tasty Results Ensue

I bought already-shelled pomegranate seeds--and if you've ever slaved away at unlocking a pomegranate you'll understand why. And I was super excited. Because they're pomegranate seeds--and if you've ever slaved away at unlocking a pomegranate you'll understand why. Oh, I had such grand plans for those pomegranate seeds--heating them over a dry skillet so they started to gush their juices before adding a little honey and a splash of wine to make compote...

But it was not to be. When I opened the package they had fermented. It smelled like a vinegary disgusting mess, like a gym sock had mated with corked wine. Sigh. But all was not lost. I still had some very ripe, luscious roma tomatoes and an open bottle of red wine. Together, these two would compliment my seared pork chops in albeit a different way that originally planned. Success!


Pork Chops & Tomato Burgundy Sauce
--2 pork chops, bone-in, 3-4 oz. each
--kosher salt and cracked pepper
--2 TSP olive oil
--1 shallot, minced
--1 cup dry red wine
--1 cup beef stock or broth
--2 medium ripe roma tomatoes, chopped into thumbnail-sized pieces


Heat a stainless or cast-iron skillet over high heat. Season the pork chops on both sides with the salt and pepper, using your fingers to press the seasoning into the meat. Reduce the heat on the skillet to medium and add one teaspoon of olive oil to the pan, swirling to coat. Sear the pork on both sides for 3-4 minutes, until a nice crust is formed (this will lock the juices in).

Place the pork chops in an oven proof dish and continue cooking at 250 degrees while you make the sauce.
In the same skillet used to sear the pork chops, add one teaspoon olive oil and the shallot. Sauté 2 minutes before adding half of the wine. Use the wine to de-glaze the pan before adding half of the beef stock.

Change the heat to high and bring to a boil. Reduce to a simmer and cook until it reduces. Add the tomato pieces. Add wine and stock as needed to make more stock.

Remove the pork chops from the oven and nestle them into the sauce pan. Remove from heat and let sit one minute before serving. Plate the pork chops and spoon the sauce and tomatoes over the top of the chops.
Dammit Jim, I'm a cook, not a doctor...
Time: 25 minutes
Serves: 2
Calories: 439 per serving

29 April 2011

Hold Me Closer Tiny Burger

You know what's awesome about sliders? They're just tiny versions of something tasty! Sliders have such mass appeal that next to the regular hamburger and hot dog buns, you can now purchase tiny buns too. Sliders are a great way to portion control and also stretch your budget. You can make a pound of ground anything or a slab of tuna or salmon go farther and feed more folks.

These sliders are made of lamb--a great source of protein and iron--and are topped with an equally Greek-inspired tzatziki sauce. You get two recipes for the price of one today!

As always, if you make this or anything else please email me or hit me up on the interwebs so I know how much you liked it. Our Facebook friends can also post their own pictures and I guarantee your photography is probably better than mine...
Lamb Sliders with Tzatziki
--1 lb. ground lamb
--garlic, minced
--small onion, minced
--salt and pepper
--1 egg
--1 cup mixed greens
--12 wheat slider buns


Tzatziki Sauce
--2 cups greek yogurt
--garlic, minced
--1 small cucumber, diced
--1/4 cup of shredded mint leaves, stems removed
--1 tsp olive oil
--2 tsp lemon juice
--pinch of salt

Place the ground lamb, garlic, onion, and egg in a large bowl. Season with salt and pepper and then use hands to mix. It will feel super gross but trust me, mixing this up with your hands is better than using a spoon.

Form the ground lamb mixture into 12 equally sized patties. Fire up the grill and cook the sliders for 3-4 minutes on each side or until cooked to desired doneness. Hey, who am I to judge how rare or well done you like your meat? I do, however, highly recommend that you toast your buns...
In a separate mixing bowl combine the tzatziki ingredients.

Place each slider on a toasted bun. Top each burger with some mixed greens and a dollop of tzatziki sauce. Happy grilling!
Dammit Jim, I'm a cook, not a doctor...
Time: 30 minutes
Serves: 12 sliders
Calories: 217 calories per slider

25 April 2011

Asparagus & Sweet Peppers: Delightful Match!

I am a big fan of color--big fan. My couch is red, my hangers are lime green, the chairs on the porch are electric blue, and few clothes in my closet follow a neutral palette. So it's no surprise that I also like colorful meals. Meals or dishes with lots of color have different flavors, variety, and are usually really good for you. What I especially love about this dish is that it even looks like Spring!

When my father and his brothers were young boys, asparagus grew wild along the banks of the canals and creeks near their childhood home. The boys would go out and hand cut the asparagus and bring it home for dinner. Call me wistful or nostalgic, but I just think that's a really cute visual! Asparagus popping up at the local market is a sure sign that Spring is here.
When choosing asparagus, I grab the smallest, most tender stalks I can find. The sweet peppers compliment the asparagus--which can have a slightly bitter flavor according to some--and when mixed inside a creamy risotto...I'm salivating! I want to make this dish again right now!

Spring Risotto With Asparagus & Sweet Peppers
--2 tsp olive oil, divided
--1 small shallot, diced
--1 cup arborio rice
--1 cup wine
--1 cup chicken broth
--1 oz. goat cheese
--1 bunch fresh asparagus, ends removed and stalks snapped into 2-inch long pieces
--4-5 small sweet peppers, roughly chopped
--black pepper


Heat a medium-sized saucepan on medium-high heat. Add 1 tsp of the olive oil and the shallot and sauté for a few minutes, until the shallot begins to get translucent. Add the dry arborio rice and stir for 1 minute before adding 1/2 cup of the wine. Stir regularly and as the rice absorbs the wine, add the other 1/2 cup of wine. Once the rice has absorbed the wine begin adding the chicken broth in 1/4 cup increments, stirring regularly and allowing the rice to absorb the broth before adding more.
While the risotto cooks, heat a small frying pan over medium-high heat. Add the remaining 1 tsp of olive oil and the asparagus and peppers to the pan. Crack a healthy dose of black pepper over the veggies and sauté until tender, tossing regularly for even cooking.

When the veggies are done add them to the rice pot, stirring well to combine. Add the goat cheese and again stir well to melt the goat cheese and mix the creamy deliciousness into the risotto. Serve and top with more black pepper if desired!

Dammit Jim, I'm a cook, not a doctor...
Time: 30 minutes
Serves: 4
Calories: 271 per serving